Friday, May 2, 2014

DIY? Nah!

Well, we decided to skip the part of the DIY process of building a new room that both the husband and I hate "doing it yourselves". Taping, mudding, sanding, and painting. We have done those things several times in the past in other rooms and other houses and did not feel like repeating it in this house with additional small humans and way less time on our hands.

So, we started the search for someone to do our most hated DIY chore of finishing the walls and we found someone that I may have actually met at some point in my life even though I don't remember it. A friend from high school has a brother in construction and he had the best quote by far of the people that 1) called us back, 2) showed up, and 3) sent us a quote.

He'll be coming out next week to start on the walls. In addition to the walls we asked him to quote installing the cork flooring and again it was too good of a deal to pass up so we won't be taking on a flooring installation for the first time ever. We picked out the flooring and the paint and sadly, we ended up picking a neutral light tan that flows well with the colors in the rest of the house. I kind of wanted to step out a bit more and get some color in that room, but I'm a big color chicken who is now color shy due to the blue color selection in our master that I'm still not happy about. We are living with it because painting vaulted ceiling walls twice is no one's idea of a good time. Maybe in another 5 years we'll be ready to try again in there.

Anyway, we selected Wicker by Valspar from Lowes for the walls and Lisbon Cork Tobacco Road from Lumber Liquidators. We've replaced the carpet in 3 of our bedrooms with hardwood from LL and have been very happy with the quality of their products thus far and hopefully we feel the same with the cork flooring.


That's our news for now. We have the paint and will be picking up the flooring next week before he comes to start the work on the walls. I'll have more updates as changes occur without us having to do more than click the shutter button and write a check.

Sunday, January 5, 2014

And then there was drywall - days 4, 5, 6, etc.

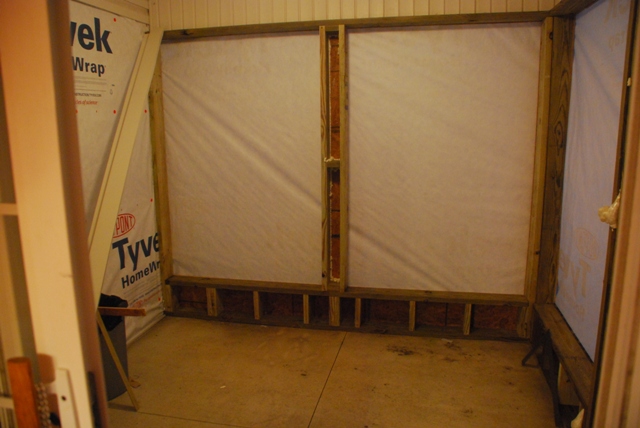
Well, I totally did not understand the amount of work left to do before we could drywall the rest of the walls around the windows and exterior door. There was a lot of very frustrating work getting the window reveals to be equal all the way around due to uneven walls, ceiling, and floor while the windows themselves were perfectly level and plumb. You don't even want to see the mess underneath the drywall in order to get everything straight and even. There were many, many days of trying to get it all correct and we finally reached the point where we could finish out the drywall on the walls.


Other than two little strips to go in the outside corner, it is done and ready for tape and mud. We've decided to hire someone to do this messy job because we've done it enough times before to know that we don't have the patience for the thin coats required to make everything look smooth and clean. We also both hate sanding drywall and all the mess that comes with it. It is well worth the money to have someone else do this job to get all the edges straight and clean and have the seams look seamless. Plus, all those corners around the windows won't have any trim to cover up any boo-boos that we might make. We're going to just install baseboards after the floors are installed. If we want to add trim later we can do that, but it currently isn't in the plans.

We'll continue on with the DIY on the painting and flooring after all the taping, mudding, and sanding is complete. We discovered during this weekend that if we leave the slider open to the kitchen it keeps this little room nice and warm without the need for an extra heater. I'm hoping that once the drywall is all seamed up and we have some soft cork boards on the floor it will hold the heat in even better. That means we won't need to install a small heater or floor heating at all. We'll still leave the slider installed so that we can open up that room during the summer months leaving the rest of the house free to run A/C if we want.

So, here is where we are on our list since we haven't visited it in a while.
  • Tear out the existing screening, door, and framing
  • Remove the ratty, green, plastic carpet
  • Remove the siding that is inside the screened porch
  • Frame out the new walls with 2x6 wood so we can pack in more insulation (plus the corner beam is a 6x6 so we thought it would be better to have the wall depth match and cover the beam)
  • Install HUGE new windows (which will have a nice deep sill on the inside thanks to the 2x6 framing) and a new glass door that is bigger than the teeny tiny one we have now
  • Install siding on the outside that matches our current siding (Although, we have discussed changing out all the siding for something with more interest. We're tired of beige and white houses. That is further in the future though.)
  • Tear-out of the old plywood inside the room - nope, just going to drywall right over it
  • Additional tear out of the ceiling "siding" and all the exterior trim that can be removed
  • Run new outlets and wiring for the room since it was a screened porch and currently has one outdoor outlet
  • Move the exterior light next to the slider outside to the deck - Um, yeah. The husband kind of gave away our old light so we'll be shopping for a new one
  • Reinsulate the walls and ceiling - this will only be insulate the new walls because the original walls do have insulation
  • Drywall - 98% done
  • Taping, mudding, and sanding  of the drywall (slated for February)
  • Paint - there have been suggestions for painting it purple (those are still being provided by the little ones), but I'm thinking we may end up boring and pick a white with a warm tint (although now I'm leaning towards the same taupe in the kitchen to keep things consistent).
  • Install electric underfloor heating - decided to tie into the heat duct that runs up to our youngest daughter's room - Doesn't appear to be an option now and we have decided to skip adding any heating and possibly putting a small space heater or electric baseboard one in if we find that the room gets too cold for use in the winter. No heating needed!!
  • Find some kind of flooring that we can agree with (husband wants tile, I want cork) - After researching over the winter and gaining more flooring knowledge we are agreeing on cork now and will be installing the flooring ourselves for the first time ever. Install cork flooring.
  • Install a ceiling fan (already purchased and hardware and wiring are ready to go) to keep the room cool during the warm months if the sun is beating down or we want to open the windows.
  • Figure out some kind of table and seating arrangement (banquette, benches, round table with chairs, etc.)
  • Decorate

Monday, July 1, 2013

Screen Porch Remodel - Drywall Day 3

Since we both work full-time jobs, not a whole lot gets done on the weekdays so color me surprised to come home and find my husband hard at work measuring and cutting drywall. Once I got the kids settled in with Sesame Street for a little bit I was able to lend a hand between prepping dinner and cleaning up dishes. He got three pieces cut and hung around the slider which was his goal. Good job, hubby-poo!
Left side                    and                   right side
So, we are slowly progressing and hopefully my husband will be able to start on or even finish the header (seen in the left side photo above) over the windows and exterior door tomorrow evening.Then come the time consuming cuts with the outlets.

Sunday, June 30, 2013

Screen Porch Remodel - Drywall Day 2

After getting the ceiling up yesterday we set our sights on getting a couple walls dry walled. One wall got done when the weather ended up being beautiful and perfect for lawn care and gardening. Plus, we got a visit from the lawn care/garden fairy also known as Grandpa. The gardens were looking sad. The first two are what the big garden looked like before weeding.
  
This is how it looked after quite a bit of work from my husband and his father.
 The raised beds got some love with weed removal as well.

All that outdoor work didn't stop the indoor though because one wall got drywall.
The next day will hopefully bring drywall to the slider door wall. Then begins the Tetris cut work around the windows and new outside door. Should be interesting to see how it all pieces together.

Screen Porch Remodel - Long Time, No Update

It has been a very long time since I updated this blog on the progress on the screen porch. There wasn't a whole lot of change other than some wiring, insulation, and exterior lighting and caulking.

Here's where we ended up after some work here and there over the fall, winter, and spring. The wiring was run outside for the new exterior light. We also beefed up the number of outlets in the room by running some under the new windows.
Then we added installed insulation and pumped Great Stuff into the areas where insulation wouldn't fit. The wiring box for the ceiling was upgraded to handle a fan and light. You can see in the photo below where the insulation was removed to hopefully tie into the HVAC line in the ceiling, but we couldn't find any vent pieces that would tie into that line with such a small clearance. We gave up and decided to just leave it alone.
 You can barely see the new outlets peeking out from behind the mess and insulation.

 More outlets under the windows.
It is definitely a mess in progress.
That brings us to yesterday where work began again since the biking season for Ohio Randos has slowed down a bit. Walls were measured, calculations were made, and drywall was purchased. It was a hot, muggy day, but that didn't slow down the dry-walling machine that is my husband. We even had some "help" from the little girls at times. The ceiling panels were all cut and mounted successfully. Dyrwall - Day One is Complete.

Let's look back at that to-do list shall we?
  • Tear out the existing screening, door, and framing
  • Remove the ratty, green, plastic carpet
  • Remove the siding that is inside the screened porch
  • Frame out the new walls with 2x6 wood so we can pack in more insulation (plus the corner beam is a 6x6 so we thought it would be better to have the wall depth match and cover the beam)
  • Install HUGE new windows (which will have a nice deep sill on the inside thanks to the 2x6 framing) and a new glass door that is bigger than the teeny tiny one we have now
  • Install siding on the outside that matches our current siding (Although, we have discussed changing out all the siding for something with more interest. We're tired of beige and white houses. That is further in the future though.)
  • Tear-out of the old plywood inside the room - nope, just going to drywall right over it
  • Additional tear out of the ceiling "siding" and all the exterior trim that can be removed
  • Run new outlets and wiring for the room since it was a screened porch and currently has one outdoor outlet
  • Move the exterior light next to the slider outside to the deck - Um, yeah. The husband kind of gave away our old light so we'll be shopping for a new one
  • Reinsulate the walls and ceiling - this will only be insulate the new walls because the original walls do have insulation
  • Drywall (in progress)
  • Paint - there have been suggestions for painting it purple, but I'm thinking we may end up boring and pick a white with a warm tint.
  • Install electric underfloor heating - decided to tie into the heat duct that runs up to our youngest daughter's room - Doesn't appear to be an option now and we have decided to skip adding any heating and possibly putting a small space heater or electric baseboard one in if we find that the room gets too cold for use in the winter.
  • Find some kind of flooring that we can agree with (husband wants tile, I want cork) - After researching over the winter and gaining more flooring knowledge we are agreeing on cork now and will be installing the flooring ourselves for the first time ever.
  • Install a ceiling fan to keep the room cool during the warm months since there isn't any HVAC ducting to it - we'll still install a fan to keep it comfortable when the windows are open
  • Figure out some kind of table and seating arrangement (banquette, benches, round table with chairs, etc.)
  • Decorate

Saturday, October 6, 2012

Screen Porch Remodel - Day 6 and a couple hours

Day six was the day that the outside was to be finished. Well, it almost got there...

The siding was put up on the deck side and the tear out on the other side began and it was decided that they would run out of time to finish it that day. We used the light mount box that was on the inside of the screen porch on the outside for a future light purchase. Some of the siding is pretty dirty from being stored in our pole building and some of it is a slightly darker color from being sheltered from the sun inside the screen porch, but it should all match up after a good washing and some sun exposure. So, here is where it stood after a complete day six.

 Deck side complete. Check!

 J in his natural state or just trying to figure out if they can complete the other side before the end of the day.

Starting the tear out of the other side before deciding to call it a day.

The next day of work came and what they thought would be a few hours ended up only taking them an hour tops. Guess that work could have been finished on day six instead of day six plus a few hours. That's all right, we got to visit with Jon for a bit before he went home. Here is the outside complete in all it's windowed, doored, and sided glory.

 You can really see the color difference in the extra pieces here, but they should clean up and match nicely.

 Lots of little cuts to go between the windows and on the corner behind the drain.

Here is the side that only took an hour to complete.

Now we look into the interior, plus a few other plan adjustments. Let's revisit our to-do list, shall we?
  • Tear out the existing screening, door, and framing
  • Remove the ratty, green, plastic carpet
  • Remove the siding that is inside the screened porch
  • Frame out the new walls with 2x6 wood so we can pack in more insulation (plus the corner beam is a 6x6 so we thought it would be better to have the wall depth match and cover the beam)
  • Install HUGE new windows (which will have a nice deep sill on the inside thanks to the 2x6 framing) and a new glass door that is bigger than the teeny tiny one we have now
  • Install siding on the outside that matches our current siding (Although, we have discussed changing out all the siding for something with more interest. We're tired of beige and white houses. That is further in the future though.)
  • Tear-out of the old plywood inside the room - nope, just going to drywall right over it
  • Additional tear out of the ceiling "siding" and all the exterior trim that can be removed
  • Run new outlets and wiring for the room since it was a screened porch and currently has one outdoor outlet
  • Move the exterior light next to the slider outside to the deck - Um, yeah. The husband kind of gave away our old light so we'll be shopping for a new one
  • Reinsulate the walls and ceiling - this will only be insulate the new walls because the original walls do have insulation
  • Drywall
  • Paint
  • Install electric underfloor heating - decided to tie into the heat duct that runs up to our youngest daughter's room
  • Find some kind of flooring that we can agree with (husband wants tile, I want cork)
  • Install a ceiling fan to keep the room cool during the warm months since there isn't any HVAC ducting to it - we'll still install a fan to keep it comfortable when the windows are open
  • Figure out some kind of table and seating arrangement (banquette, benches, round table with chairs, etc.)
  • Decorate

Friday, October 5, 2012

Screen Porch Remodel - Day 5 Follow-up

So, there was a minor detail I forgot to mention about what happened on work day five. Word of caution to all the DIYers out there. Watch your bonus helpers. Watch them very, very carefully. For that matter, depending on who they are, you may not want to let them hold or use any tools.

Someone, we won't name names, thought the J channel would be better off attached to the window frame and not the Tyvek wrapped OSB. He was adamant that his way would work best despite repeated warnings and orders to put the hammer down. Here are the results.


That is a 1 inch hole in the side of the window.

So, we fixed it. More of that silver tape from the top of the window all the way down the side of the window frame. We got lucky. The glass didn't shatter, the frame wasn't damaged more, and we didn't have to replace the whole window which would have been very, very pricey. Lesson learned by all.

Sunday, September 30, 2012

Screen Porch Remodel - Day 5 (It's the little things)

It doesn't look like a lot of change in the pictures, but there was a good bit of work done before and during day five. Here is the breakdown of the work completed before day five.
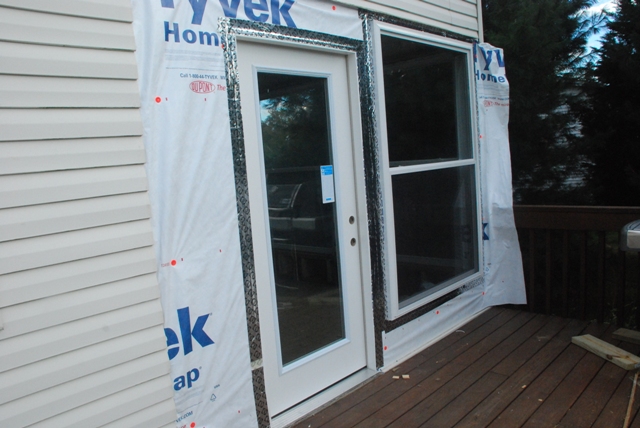
  • Taping completed on the windows and door
  • Door painted to match the siding
  • Door hardware installation started (one strikeplate needs replaced and everything needs locktight)
Day five brought out our worker Jons in addition to a bonus worker grandpa who stopped by to add color commentary. They cut, fit, and attached all the J channel around the windows and doors. They also planned out the siding attachment strategy with a box for a future outdoor light fixture and trying to make the siding as seamless as possible with the existing house. It will be interesting to see how it all comes out on the next work day. Here are some pictures of the day.

 J channel application in process.

 Before the J channel...

 My Jon gives the other Jon an "adjustment".

 Precision cutting and fitting.

 Painted door with hardware.

 Completed day five work (can you even see the J channel?)

More practically invisible J channel and a lovely corner piece to clean up that messy Tyvek.

Day five is in the can and hopefully the next work day brings some siding into the picture. We need to get this house buttoned up before we get our first snow...usually in October. I kid you not.
Saturday, September 29, 2012

A little monster for October

I was inspired by this monster wreath tutorial over on Baby Rabies and had to try it out. I've been pinning wreaths to make for my front door and this is the first one I've actually completed. I made some adjustments in making the wreath. I shied away from using a hot glue gun because I didn't feel like digging it out and plugging it in. I just used small straight pins to pin the black ribbon down over the wreath (14" straw wreath with the plastic still on), used pins to tack on the foam teeth, and pins to attach the bow-tie and hanging ribbon. Here is my finished product.


He's a bit fluffy and gets smooshed behind the storm door so I might trim him back a bit. For now, we love him.

Screen Porch Remodel - Day 4 (BIG DAY)

The windows and doors were installed on day four* which made this a pretty momentous day. Additionally fun, was that it was completed right as the rain started coming down. The work necessitated an additional worker and our neighbor was kind enough to step up and give us a hand.
 There are 3 workers in this picture. See if you can find them all.

 We have windows and doors!

 After the install my husband started taping up the outside to seal it up and he added some more Great Stuff which is indeed great stuff.
Starting to look like a room rather than a mess.

Stay tuned for Day 5 which will be coming soon as well.

*Also, note that these days are not consecutive. They are mostly occurring on Saturdays with a Sunday if the football game isn't a home game.

Wednesday, September 19, 2012

Screen Porch Remodel - Day 3

My worker Jons were back at it on day 3, but this day was shortened due to birthday party festivities that were planned for 4:00pm. At least this day they got to start on time. They completed all the framing, tacked on the Tyvek, filled in the little spaces with Great Stuff, bent all the flashing pieces that would be needed, and installed a couple as well. Here are the after work pictures with only one during action shot, which were all I got to take today because I was running around like crazy trying to get ready for my daughter's second birthday party.

 Love my worker Jons.

That Great Stuff really does expand.

The view from the kitchen (we were expecting quite a bit of rain so they didn't cut the Tyvek over the openings).

Future door placement. The slider to the kitchen is on my right.

I'm going to love this unimpeded corner view.

Lovely Tyvek. There is flashing installed along the edge where the deck meets the concrete pad to keep the moisture off the framing boards.

This side will receive its flashing on the next workday.

Next up will be window and door installation and it will really start to look like a room! It's going to get way more exciting soon. After that a day of siding installation and the interior decisions begin.

Forgot to mention in a previous post...when the worker Jons removed the siding on the solid interior wall they found a metal plate covering a vent opening. We're not sure if that is an outflow or inflow vent, but if it is an outflow vent we'll be able to have central air and heat in this room. No need to install the underfloor heating like we had originally planned. We also don't have to depend on the ceiling fan and hopefully getting some of the cooler air in the house to flow out there in the super hot months. That certainly makes our job quite a bit easier. We're planning a test for this weekend when the temperatures are supposed to dip into the 40's at night.

I do think we'll want to be able to close off that vent completely for the days we want to open up the porch/sunroom/breakfast nook*, but not the whole house for some reason.

*I'm at a loss for what to call this room once it is done. We just called it the porch for so long. Sunroom? Breakfast nook? 4 season room? Hmmm...

Sunday, September 16, 2012

Screen Porch Remodel - Day 2 More tearout with some framing

Day brought lots of work because they got a full Saturday to work. At least there would have been a full Saturday if the tool rental company hadn't rented out the tool that we told them we would be picking up that morning. Grrr...so that set the day back a bit finding another place to use for the rental. Some siding removal, Tyvek application, and framing happened. Here are the results with some during pictures too.

 My worker Jons.

 One side framed.

 Worker Jons goofing around.

 End of Day 2 accomplishments. One side framed and the other started.

It's going to be lovely.

Screen Porch Remodel - Day 1 Tearout

A Wednesday evening was spent tearing out the old screening and framing. Here are the results of that work. I only got shots from inside and never made it outside to get some shots from there. Just picture what it looked like before, but without the screen and white 2x4s and the ugly door. No more astroturf carpet and most of the wall siding had been removed.